GoToMeeting Backgrounds Guide
GoToMeeting allows you to replace, blur, or customize your webcam background via third-party services, like ChromaCam and ManyCam.
Using your paid GoToMeeting account credentials, you can access and download ChromaCam for free (We’ll discuss ManyCam in a bit).
It’s also recommended that you use the desktop app to host or join a meeting if you intend to access ChromaCam.
That said, besides the ability to access and download ChromaCam, your desktop requires certain hardware capabilities to enable you to change your GoToMeeting background using ChromaCam.
Recommended Hardware Requirements for GoToMeeting Backgrounds Feature
- Operating System: macOS Mojave (10.14) or higher and Windows 7 – 10.
- Processor: Intel 6 gen i5 quad-core processor or newer, operating at 3.3GHz or above.
- Memory: 4GB + RAM
- GPU: OpenCL 1.2
- Camera: An embedded computer camera or any RGB cam.
How Do I Download ChromaCam Pro?
Normally, your GoToMeeting account already has ChromaCam but if you can’t find the “Custom background” setting, then your admin probably disabled the feature.
You’ll have to reach out to your admin to enable it. That said, you need admin rights to download ChromaCam.
Here’s the breakdown on how to download and integrate ChromaCam to GoToMeeting:
- Navigate to https://globalGoToMeeting.com
Tap Settings in the left menu
Hit Custom background and then Download ChromaCam.
Follow the on-screen instructions for installation.
Next, access ChromaCam Pro by signing in using your GoToMeeting login details.
Allow LogMeIn to integrate to ChromaCam
You can now use ChromaCam whenever you host or join a meeting as it’ll now be available as a webcam device.
How to Test your Webcam Before Changing your GoToMeeting Background
Before you change your actual background it is recommended that you test your webcam to ensure that your virtual backgrounds show up in the best way possible. And you can test and preview your webcam either before a session or during one.
Testing Your Webcam Before a Video Session
To do this:
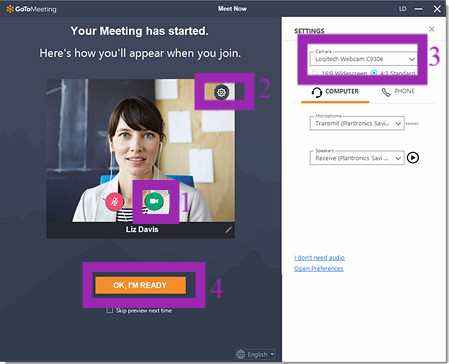
- Tap on the camera icon on your screen to preview your video feed.
Click on Settings and then choose an option from the camera drop-down menu to change your camera device.
If you want to join a video session with your camera turned on, hit Ok, I’m ready.
Test your Camera While In Session
To test your webcam while in session do this:
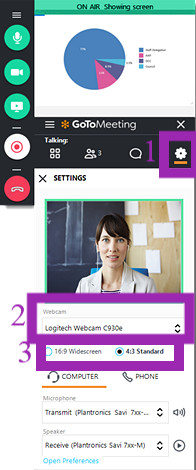
- During a meeting, tap the Settings icon
You’ll see a preview of your camera. Next, use the drop-down menu directly below the preview feed to choose a different camera device.
Use the radio buttons to adjust the camera size. If you’re using a window tablet, for example, you’ll be able to change camera views from back to front view (vice-versa) using the radio buttons.
To begin sharing your video feed, tap on the camera icon in your GoToMeeting control panel or at the bottom of your screen.
How to Test your Webcam at Any Time
To test your webcam at any time. Here’s what to do:
- Navigate to your system tray and right-click on the Daisy icon and then hit preferences.
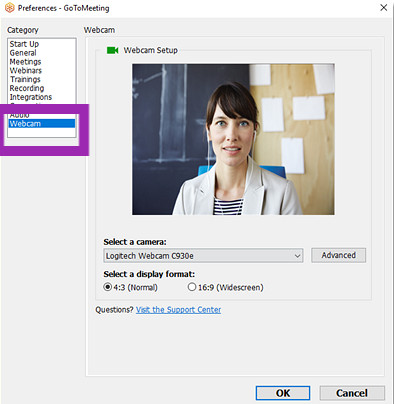
Tap webcam from the menu on the left of your screen.
If your webcam is connected, you’ll see a preview of it on your screen. Again, you can use the left-side drop-down menu to choose a different camera and the radio buttons to adjust the size.
Hit on advanced if you want to get into your camera’s software and manipulate settings like exposure and zoom.
Once you’re done tap OK.
How Do I Use ChromaCam In a Meeting to Change my GoToMeeting Background?
After you’ve tested your camera, you can now proceed to change your actual background during a meeting to your preferred filter or background.
Here’s how:
- Join or start a meeting
Next, tap the Settings icon in the top menu
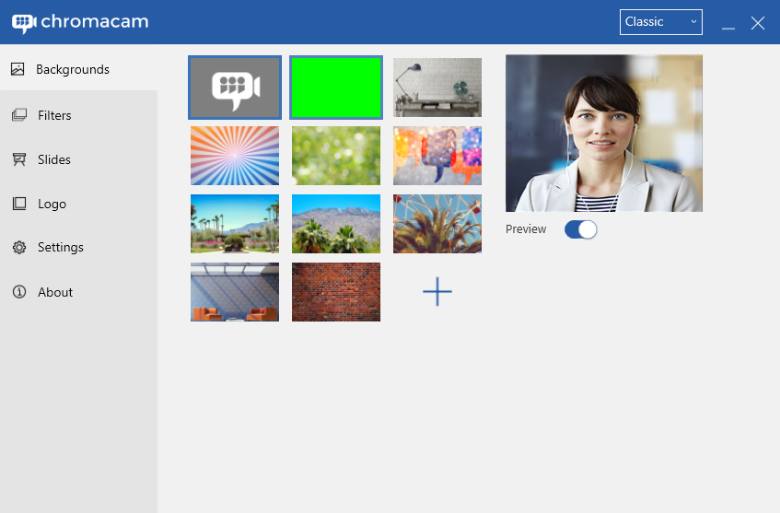
Under the Webcam menu, hit ChromaCam
By default, your webcam background will automatically blur. And you’ll be able to see a preview by the right of our screen. Keep in mind that you can adjust the blur level, upload custom backgrounds, or choose other GoToMeeting’s preset filters. Then hit the webcam icon to share your video feed.
How to Replace your Background on GoToMeeting without a Green Screen Using ManyCam
For this, you’ll need to use a tool called ManyCam. The app allows you to replace your background on GoToMeeting and just about any video conferencing app without having to use a green screen.
Here’s how it works.
The first step, open up ManyCam
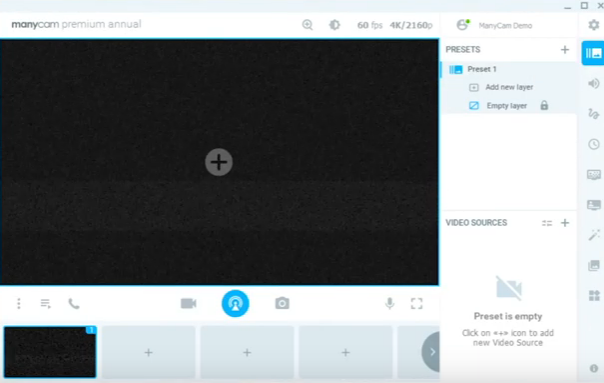
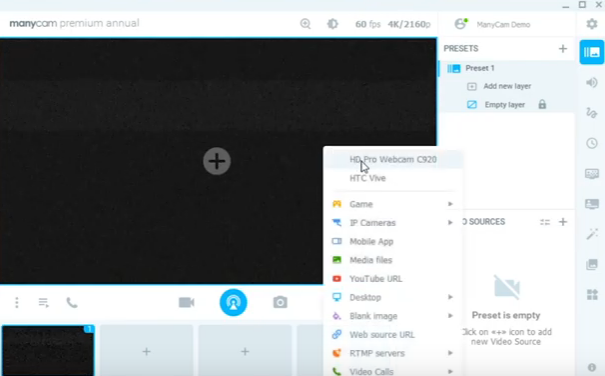
Next, connect your webcam by right-clicking on the main video feed and then selecting your camera among the options
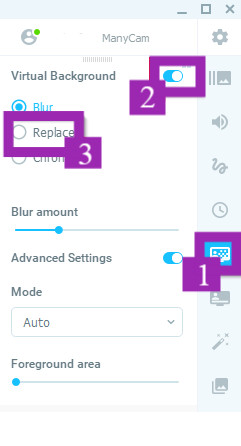
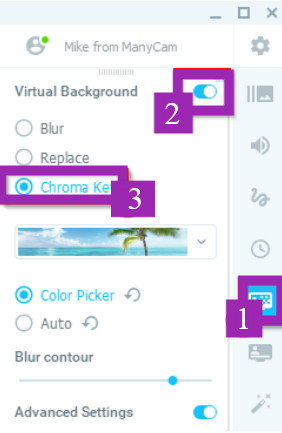
Then navigate to the Chroma Key tab and then toggle on the virtual background feature.
Once you flip the switch, it detects and blurs your background automatically.
Hit on Replace to remove your background and then choose any image available as your virtual background.
You can add your custom visuals as well.
With that said, let’s see how to connect ManyCam with GoToMeeting. You can open up GoToMeeting with their app or right from the web as below:
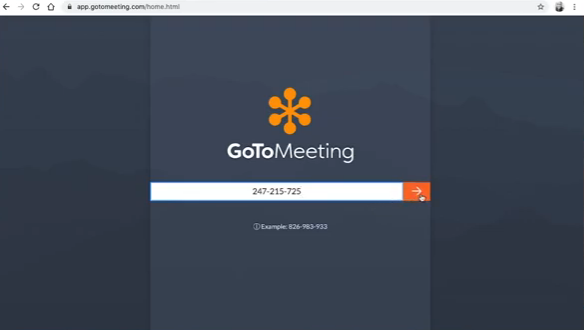
Next, type in meeting ID or name. And hit the arrow
Once the page opens up, click on the settings icon, and where it says camera you can choose ManyCam as your video source.
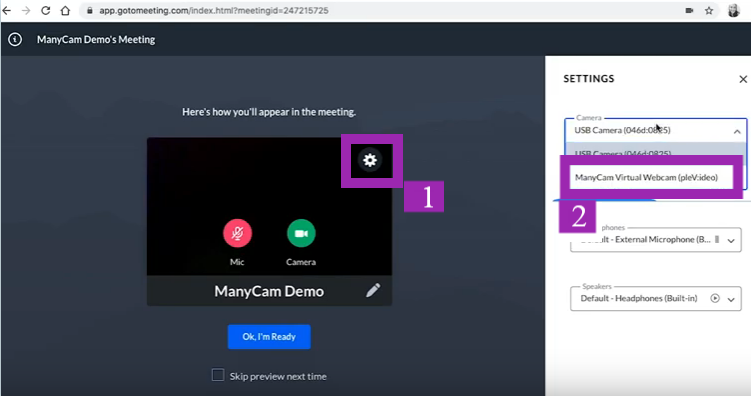
You’re then set to go, so click the Ok I’m Ready button.
How to Replace your GoToMeeting Background with a Green Screen using Chroma Key via ManyCam
Chroma key compositing is a technique for layering two visuals (images or video streams) together based on the Chroma range (color hues).
It’s a method that is used a lot in many industries to take out a background from the subject of the video or picture – majorly in motion-picture, video game, and newscasting fields.
The Chroma key feature permits you to replace your actual background from the video feed and change it with a new image.
However, the Chroma key feature on Manycam will not work without a blue or green screen put behind a person or object in the video frame.
To enable Chroma key, navigate to the Chroma key tab, and then hit the on/off button to permit the virtual background feature. Then choose the Chroma key option.
Next, pick between the Auto and Color Picker mode, either of which may result in different outcomes depending on your webcam parameters, environment, and settings.
My Computer Starts to Lag when I Change my GoToMeeting Background What Do I Do?
If you begin to experience a GoToMeeting app lag because of a background change here’s what to do:
- If you enabled the blur filter, either reduce the blurriness level or change the background to something else.
- Close all background applications
- Change back to your normal camera
Background Removal Tips
If you use green screens regularly, it’s important to note that ChromaCam is not meant to replace it, at least not yet with regards to quality.
Nevertheless, there are a few ways to ensure that ChromaCam does background removal excellently. And those are largely environmental variables: real background and lighting.
Make sure that your environment is as lit as possible. You don’t need top-notch studio lighting or bright lights to achieve quality results.
Also ensure that your background is not overly busy, or has colors that match your hair shade right behind your head. A simple background would produce better quality.
What Custom Background Image Types Does ChromaCam Support?
If you’re using ChromaCam to change your GoToMeeting background, then you can use the following image formats:
- JPG
- PNG
- BMP
- JPEG
The maximum image size you can use on ChromaCam is 4K, which is 3840 x 2160 (width x height).
With regards to file size limitation or the number of custom background images you can add, the answer is limitless.
Conclusion
That’s a wrap! While the GoToMeeting background feature is a new one, it does have similar capabilities with that of Zoom or Microsoft Teams.
The option to control the blurriness level is an aspect that sets it apart. Plus, you can add custom images and choose the kind of visual you want as your background.
If you have any questions or additional background tips please comment below!
