The Definitive Guide to Zoom Backgrounds
Zoom is the world’s most used video conferencing app, and it comes packed with a lot of customization settings that enable you to fix up your video call the way you want it.
One of such customization’s is being able to include a virtual background to your video call.
Beyond just a fun and colorful way of presenting yourself in a video meeting, virtual backgrounds offer an additional feel of privacy by concealing your real background.
If enabled, these virtual backgrounds superimpose the user (you) over a fake visual, this covers up any personal imagery you may have around you during a meeting.
How do I enable Zoom virtual backgrounds?
Zoom keeps the virtual background setting enabled by default. But if you want to navigate to this setting, you must do so via the Zoom web portal.

Using your login details, sign in, and navigate to “Settings” on the left side of the screen.
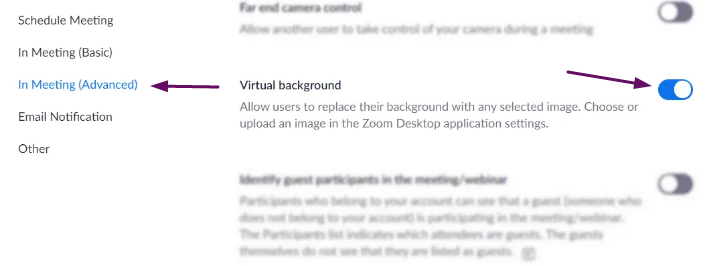
Once that’s open, under ‘In Meeting (Advanced)‘, look for ‘Virtual Backgrounds‘. If it’s disabled, everyone else including you in a meeting where you are the host will be unable to use a virtual background.
After you change this setting, you need to log out and log back into the desktop app to see the effect of the changes in your account.
You should then see the virtual backgrounds option below the ‘Video‘ tab.
Keep in mind that Zoom does not permit the Virtual Backgrounds effect to be used on its Android mobile app, just iOS.
What are the specifications for backgrounds for Zoom?
Zoom lets you add a virtual background to superimpose your real background. And also offers its default virtual backgrounds, so, yes, you can include personal backgrounds.
But whatever backgrounds you use must conform to certain specifications.
Image
- Aspect ratio: Acceptable ratio is 16:9 or best suited to fit your camera.
- Required format: 24 bit PNG, GIF, and JPG/JPEG
- Minimum resolution: 1280 x 720 pixels
Videos
- Maximum resolution: 1920 x 1080 pixels (1080p)
- Minimum resolution: 480 x 360 pixels (360p)
- Format: MOV or MP4 file
How to add a virtual background to Zoom?
After enabling ‘Virtual Backgrounds‘ in your Zoom web portal, you’ll be able to access the setting directly from the app itself.
To include a virtual background to every meeting you have on zoom, just log in to your Zoom desktop client using your login credentials.
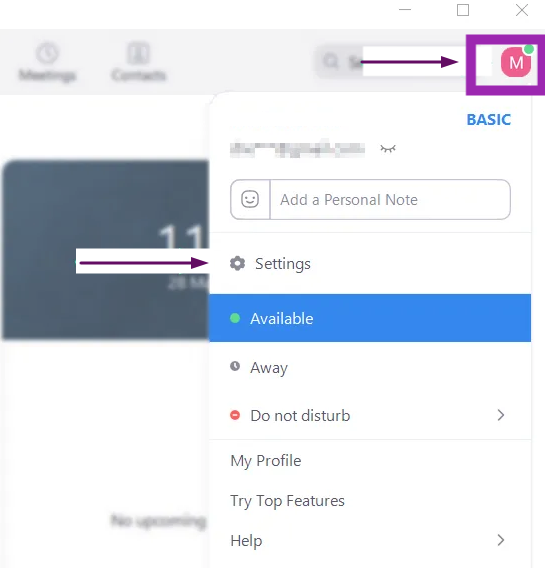
Then click on your profile picture at the top right corner of your screen. Next, hit on ‘Settings‘ to navigate to the Zoom settings panel.
Click on ‘Virtual Backgrounds‘ on the left side of your screen. From here, you’ll be able to pick from Zoom’s virtual backgrounds.
It’s important to state that if you’re a first-time Zoom user, you must download the ‘Smart Virtual Background Package‘. It will automatically pop up when you select a background to set.
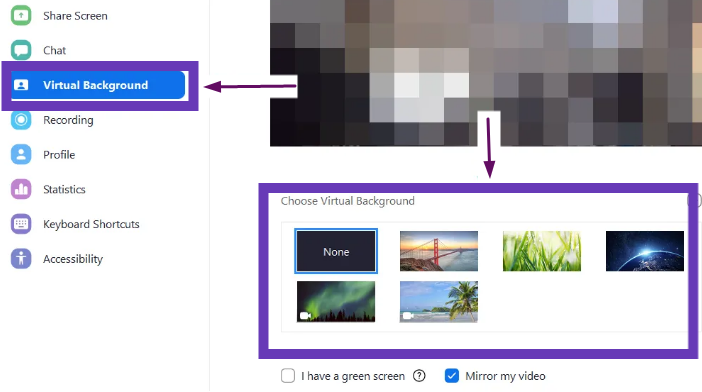
It’s best practice to tick the ‘Mirror my video‘ option at the bottom of your screen as this is how people use cameras.
Now choose the virtual background you want.
To apply the changes made, look out for a tiny preview of the virtual backgrounds in your Settings panel. Then close the Settings panel to apply your changes.
How do I change a background while in a Zoom meeting?
It’s possible to add or change a virtual background during a Zoom meeting. To do this, you must enable Virtual Backgrounds on your account as we’ve already discussed above.
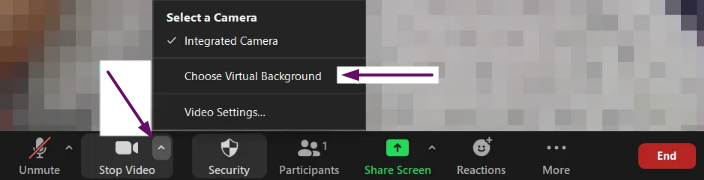
If that’s done, while in a Zoom meeting, hit the upward arrow button beside the ‘Stop Video‘ button, then tap ‘Virtual Backgrounds‘.
This will take you to the Virtual Background settings. From here you can choose a background and cancel the settings window to save the changes.
How do I add a custom background to Zoom?
Zoom permits you to customize your video meeting experience by adding personal images (check out the image guidelines above) of your choosing.
To use this feature, you’ll need to upload your images to the Zoom application.
Use the guide above to navigate to Profile > Settings > Virtual Background.
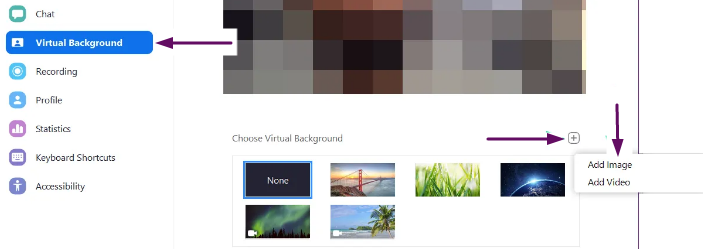
Next click on the + icon beside ‘Choose Virtual Background‘ and then click ‘Add Image‘.
Find the image you want to add as your virtual background and click ‘Open‘.
The image will be set as your virtual background automatically. After it’s added, your image will be available for you to apply as your background whenever you want.
Keep in mind, that if you tick the ‘Mirror my Video‘ option, the virtual background you apply will be mirrored.
How do I add a video background on Zoom?
If you would like to go a little further, you can add a virtual video background. A virtual video background is a video that keeps looping.
So rather than a static background, you could sit on a beach resort, with the wind causing ripples through the ocean behind you.
To set a video as your virtual background, use the steps listed above to navigate to Profile > Settings > Virtual Backgrounds.
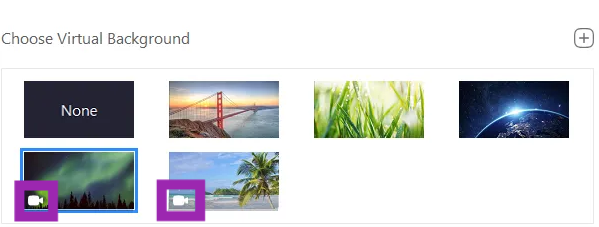
When there, click a video background. You can know a video background amongst other Visuals by the video camera image on them.
You can also include a personal video background of your choice by following the guidelines mentioned in the “How Do I Add a Custom Background to Zoom?” section.
Just ensure that your custom videos adhere to the aforementioned specifications for acceptable virtual video backgrounds.
You’ll be able to preview all the video backgrounds in the tiny video panel in your Settings window.
Choose the video background you want and then close the Settings panel to save the changes.
How can I disable a virtual background in Zoom?
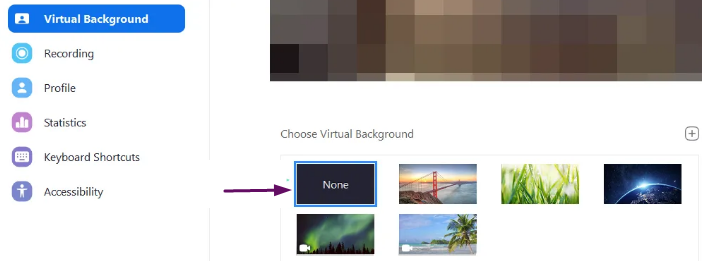
If you want to disable a virtual background and return to your actual background, you can do so by navigating to Profile > Settings > Virtual Background and clicking ‘None‘ as your background.
You also have the option to disable your Virtual background while in a meeting by hitting the upward arrow icon beside ‘Stop Video‘. And then click on ‘Virtual Backgrounds‘.
Tap on ‘None‘ and close your Settings tab. Your background will return to your current environment.
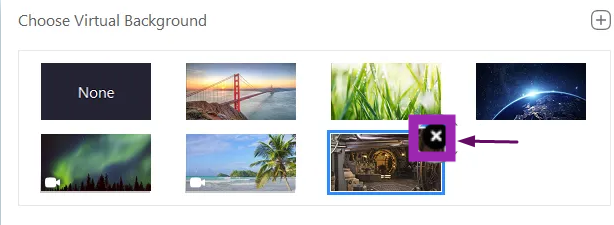
How do I remove a custom Zoom background?
If you have included a custom background to your Zoom meeting, the visual you have used will be saved to your application. This is done so you can access it easily without having to re-upload the image.
However, if you want to take out the image from your saved virtual backgrounds in your Zoom app, then log in to your Zoom Desktop app and navigate to Profile > Settings > Virtual Background.
When there, you’ll see the images you’ve uploaded along with Zoom’s default virtual backgrounds. To take out your custom background, glide the mouse on the image, and hit on the ‘x‘ icon that appears in the top corner of the visual.
If you want to re-use the image as your virtual background, you must re-upload the visual by following the instructions in ‘How Do I Add a Custom Background to Zoom?’ section above.
Can I add a GIF as my virtual background on Zoom?
Absolutely! You can set a GIF as your virtual background in your Zoom meeting. GIFs are a great way to showcase yourself in a meeting and brighten up the mood.
To use a GIF as your virtual background, you’ll first have to convert the GIF into a video. You can use various tools to achieve this but a popular one is Convertio.
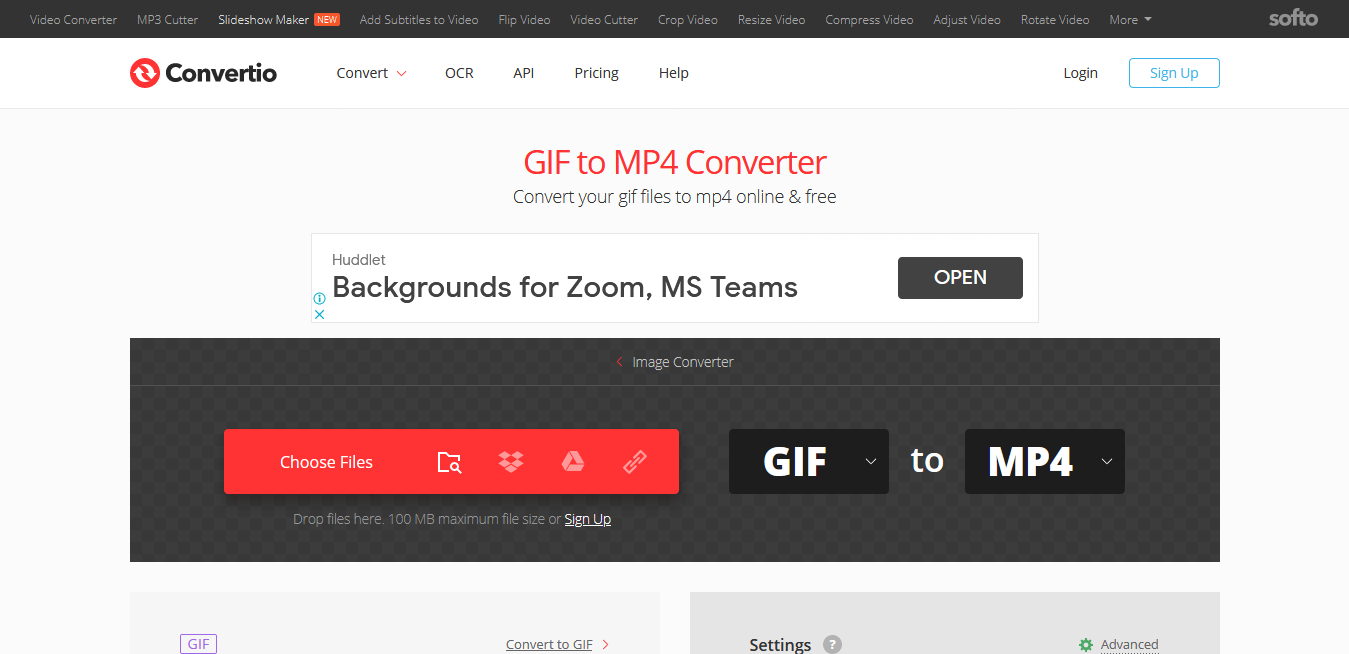
Just visit convertio.co and then hit on ‘Choose files‘.
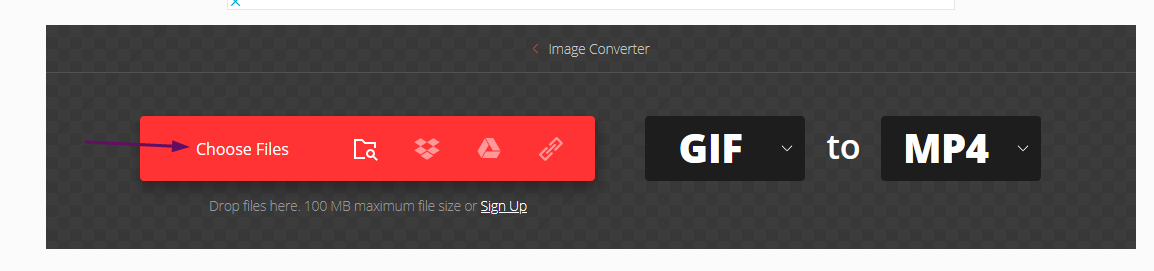
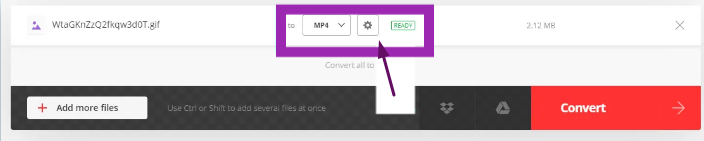
Next upload your GIF. As you can see below we’re selecting a particular image.
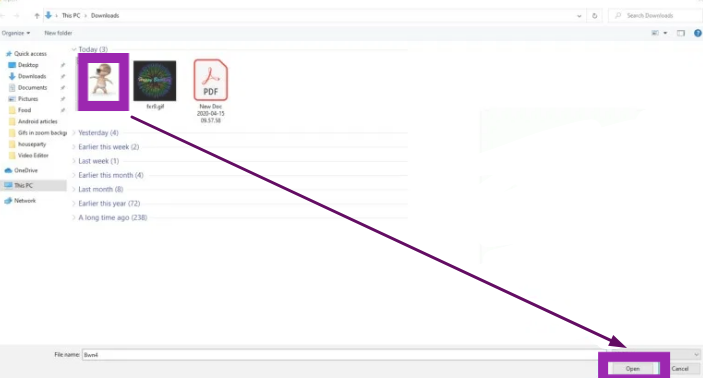
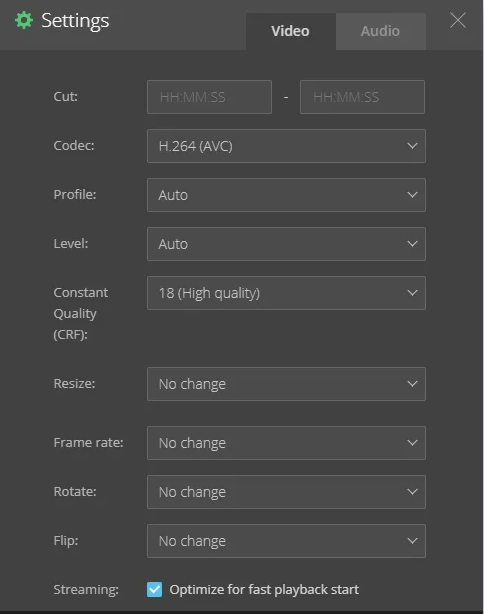
After you’ve uploaded the file, you can set the video settings. To do that hit the Setting button as shown in the image below.
You’ll see various options on your screen.
Hit ‘Resize‘ and then choose the 640×360 (YouTube 360p) option, as Zoom requires that your minimum video resolution is 640×360, 16:9 aspect ratio. And a minimum size of 5MB.
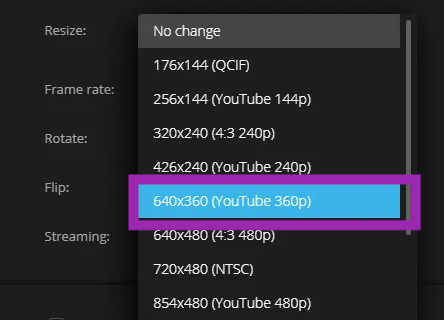
In the Resize menu, select either ‘ Zoom and crop‘ or ‘Zoom and add black bars‘. Then click the OK button.
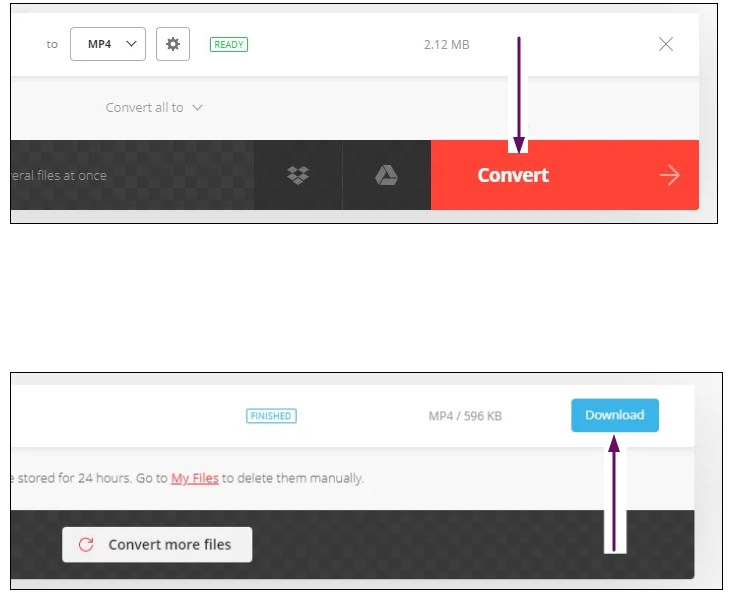
Lastly, wait until it converts your GIF to video. After it’s done converting to video, hit on the ‘Download‘ button to get the video file to your PC.
To add your GIF turn video as your virtual background, follow the steps listed above in the ‘How Do I Add a Video Background on Zoom?‘ section.
With that said, you can always download GIFs in MP4 format from websites like Giphy.com if you don’t have the time to convert one into a video.
Why can’t I see the Option in Zoom for virtual Backgrounds?
If you’ve carefully followed the above instructions to enable Virtual Backgrounds and still can’t see the option in Zoom when using the PC app, then there are a few reasons.
As discussed earlier, after you enable or disable the virtual background option in your Zoom web portal, sign out of the desktop app and back in again, to see the effect of the changes.
If that doesn’t solve the problem, then the first thing you’ll want to do is check if the owner of the account or Admin has disabled Virtual Backgrounds.
To check if the Virtual Background feature has been disabled by your admin, use the instructions stated in the ‘ How Do I Enable Virtual Backgrounds‘ to navigate to Zoom web portal > Settings > In Meeting (Advanced) > Virtual Background.
If you cannot make changes because the settings are greyed out, then your admin has disabled it. And in such situations, you must contact them and request that they enable the Virtual Background option.
When you are a participant and not the host of a Zoom meeting and you do not see the option for using ‘Virtual Backgrounds’ in a Zoom meeting, then it’s likely that the host of the meeting disabled them for all participants of that Zoom meeting.
To solve this, just contact the host and have them enable it.
The last reason for not seeing the ‘Virtual Background’ option is that your PC doesn’t satisfy the system requirements for using the Zoom Virtual Backgrounds feature.
System requirements needed in order to have a Zoom virtual background
macOS
Requirements for using Images without a physical green screen
- 6th gen i5 dual-core/higher processor. This requires MacOS 10.14/higher.
4th gen i7 quad-core/higher processor
Mac Zoom desktop client 4.6.0 (13614.1202/higher)
Requirements for using Images with a physical green screen
- Dual Core 2Ghz/ Higher (i5/i7/AMD equivalent) processor
Mac Zoom Client, version 3.5.53922.0613/higher
Requirements for using video with a physical green screen
- macOS 10.9/higher
Mac Zoom Desktop Client version 4.6.4 (17383.0119)/higher
Required processors for 720p video
- Intel i7, i9, Xeon – 2 cores, gen 4/higher
Intel i5, i7, i9, Xeon – 4 cores/higher
macOS 10.14/higher and Intel i5 – 2 cores, gen 6/higher
Other Intel processors – 6 cores/higher, except y series and atom
Non-Intel processors – 8 cores/ higher
Required processors for 1080p video
- Non-Intel processors – 8 cores/higher
Intel i5 – 4 core/higher, gen 5/higher; or 2 cores with gen 7/higher and 2.0Ghz frequency/higher
Intel i7 – 4 cores/higher, gen 2/higher
Intel i9, Xeon – 4 cores/higher
Other Intel processors – 6 cores/higher, except y series and atom
Requirements for using video with a physical green screen
- Mac Zoom Desktop Client version 4.6.4 (17383.0119)/higher
macOS 10.9/higher
Required processors for 720p video
- Intel i5, i7, i9 – 2 cores, gen 6/higher, except y series and atom
Intel i5, i7, i9, Xeon – 4 cores/higher
Other Intel processors – 6 cores/higher, except y series and atom
Non-Intel processors – 8 cores/ higher
Required processors for 1080p video
- Intel i5 – gen 5/higher, quad-core/higher
Intel i7 – gen 2/higher, quad-core/higher
Intel i9, Xeon – 4 cores/higher
Other Intel processors – 6 cores/higher, except y series and atom
Non-Intel processors – 8 cores/higher
Windows
Requirements for using Images without a physical green screen
- PC Zoom Desktop Client version 5.2.0/higher
Windows 10 (64-bit)
Intel i3 – 4-cores/ higher, gen 8/higher
Any Intel i4/higher
AMD Ryzen 5/7/9/higher
Keep in mind that because of compatibility issues, all devices with an Intel HD 620 graphics processor have to use a physical green screen.
Requirements for using Images without a physical green screen
- PC Zoom Desktop Client version 3.5.53922.0613/ higher
Intel Dual Core 2Ghz/higher (AMD/i5/i7 equivalent) processor
AMD Ryzen 5/7/9/higher
Requirements for using video without a physical green screen
- PC Zoom Desktop Client version 4.6.4 (17383.0119)/higher
Windows 7, 8, or 10 (64-bit)
Required processors for 720p video
- Intel i5, i7, i9 – 2 cores or higher, gen 6/higher, except y series and atom
The processor must use Intel GPU – except HD620 with driver version 23/higher
OS must be Windows 10, 64-bit
Required processors for 1080p video
- Intel i5 – 4 cores/higher, gen 6/higher, expect for u-series
Intel i7, i9, Xeon – 4 cores/higher and gen 4/higher
Intel CPU with HD620 graphics and OS must be Windows 10, 64-bit
i7 2 cores; or
i5 2 cores with major version 26/higher and minor version 7323/higher
Other Intel processors – 6 cores/higher, gen 4 /higher, except y series
and atom
Non-Intel processors – 8 cores/higher and frequency 3.0GHz; and 12 cores/higher
AMD – Ryzen 5/7/9/higher
Requirements for using video with a physical green screen
- PC Zoom Desktop Client, version 4.6.4 (17383.0119)/higher
Windows 7, 8, or 10 (64-bit)
Required processors for 720p video
- Intel i5, i7, i9 – 4 cores, gen 6/higher, except y series and atom
Intel i5, i7, i9, Xeon – 4 cores/higher
Other Intel processors – 6 cores/higher, except y series and atom
Non-Intel processors – 6 cores/higher, 3.0GHz frequency/higher; or 8 cores/higher
Required processors for 1080p video
- Intel i5 – gen 5/higher, quad-core/higher
Intel i7 – gen 2/higher, quad-core/higher
Intel i9, Xeon – 4 cores/higher
Other Intel processors – 6 cores/higher, except y series and atom
Non-Intel processors – 8 cores/higher and 3.0GHz frequency/higher; or 12 cores/higher
AMD – Ryzen 5/7/9/higher
Linux
- Linux Zoom Desktop Client version 2.0.91373.0502/higher
Dual Core 2Ghz/higher (AMD/i5/i7 or equivalent) processor
Zoom requires a physical green screen
iOS
- iOS Zoom Mobile App version 4.1.27541.0627/higher
iPhone 8, 8+/X
iPad Pro or the 5th/6th generation iPad 9.7
Why am I unable to add a custom virtual background to Zoom?
If you’re having issues while adding a personal image or video to Zoom as your virtual background, then it could be for some of these reasons.
The first could be that your image or video doesn’t satisfy the requirements of visuals that can be used as backgrounds on Zoom. If your image or video satisfies the requirements but you’re still unable to use it, then it could be one of the following reasons:
1. Your Zoom App needs to be updated
The first step to fixing any problem with your virtual backgrounds is to look for updates to your Zoom client, whether mobile or desktop.
If you’re facing this issue with your Zoom mobile app, then go to the Google Play Store or the Apple App Store based on your mobile OS and look for updates.
If there’s a pending update, just update the Zoom app. Alternatively, if you’re using the desktop client, use these instructions to look for updates on Zoom.
Open your Zoom PC client and tap on your profile picture at the top right corner of your screen. Next, hit on ‘Check for Updates‘.
Zoom will search for any available updates. The length of the search depends on your network speed and the RAM space that’s free in the background.
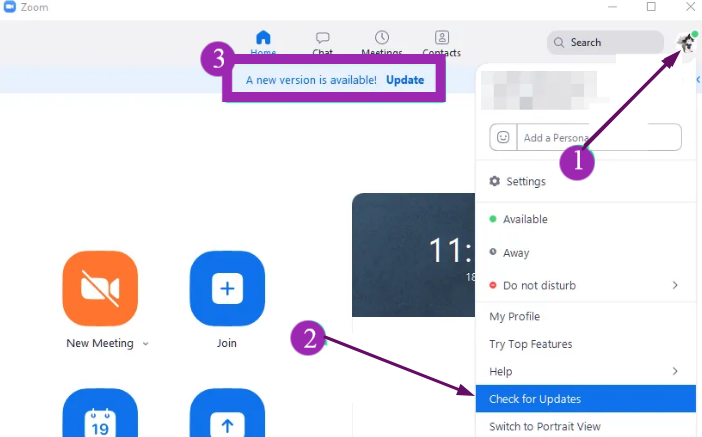
If you have no update, you’ll see a dialog box with the message ‘You are up to date‘. But if there is an available update, then you need to follow the instructions on your screen to update your Zoom client.
After you do this, your Zoom PC client should be the latest version, which should let you use virtual backgrounds without hiccups, if the problem you were facing was because of a failed update or bug.
2. Ensure that you met the hardware requirements for virtual backgrounds
Including a virtual background to your video call demands significant processing power from your PC.
This means that if your desktop is underpowered, then you can’t add a virtual background to Zoom.
You can check the system requirements listed above to see if your desktop PC is compatible with the feature.
Alternatively, you can also navigate to your desktop client and tap on your profile picture and choose Settings.
From here, click on the ‘Virtual Background‘ option that shows up on the left sidebar.
A dialog will pop up with the message ‘Computer does not meet requirements‘.
This means that your system doesn’t have the required resources to support using a virtual background to your Zoom video feed.
Common problems with Zoom backgrounds and how to fix them quickly
1. Flipped background
If you notice that your custom Zoom virtual background is flipped horizontally and that there are rough edges around your body outline, then ensure that you have switched off the mirroring option in Zoom.
To disable the mirroring option for your virtual Zoom background here’s what to do:
First Step
While in a meeting, tap on the ‘Video‘ option at the bottom left side of your Zoom screen and click ‘Video Settings‘.
If you aren’t in a meeting, open up your Zoom PC client, hit on your profile picture at the top right corner of your screen and choose ‘Settings‘.
Click ‘Video’ in the left sidebar of your ‘Settings‘ video to navigate to your Zoom video settings.
Second Step
On the right side of the Settings window, below the My video section, untick the box for ‘Mirror my video‘. It’s normally the second option from the top.
Zoom will automatically save the changes you’ve made. However, if you’re in a meeting, you may have to log out and in again for your changes to become visible.
If you are not in a meeting, just launch one to see if Zoom saved the settings applied.
2. Blending problem
If the virtual background you’ve set up for your video feed is blending with your actual background and resulting in glitches, then it’s possible that you don’t have enough light in your surroundings to help Zoom differentiate between the two.
You could try turning on extra lights if workable or adding an alternate light source like opening a window.
Alternatively, you can move to another room that is much more lit and that should fix the blending problem with your virtual backgrounds.
3. Custom videos aren’t working
If you’re facing problems uploading your custom video backgrounds to the Zoom client, then it’s possible that the video is too compressed or there are encoding issues.
It could also be that you’re trying to upload a wrong format as Zoom only supports MP4.
If the above conditions hold for you, then you should try converting your video format to MP4 with better bitrate and encoding for premium results.
You can do so through any video conversion app on the web. A good one is ‘Handbrake’ Transcoder.
The app is free and open-source and has a lot of customizable options.
Conclusion
We hope this extensive guide on Zoom virtual backgrounds helped you set up your Virtual Background easily. And fix any background related problem you may be facing.